Continuing our exploration of cinematic filmmaking and its key elements, this time we dive into an engaging and valuable topic: “Cinematography Techniques”. We’ll explore what these techniques are from a technical standpoint, as well as how they influence storytelling and the screenplay. Stay with me.
Cinematography techniques refer to the technical and creative aspects of filming, including camera movements, camera angles, focus, lighting, filters, and lenses. Depending on the style of the film and the director’s vision, these techniques are used creatively and play a central role in filmmaking. They are the tools through which stories, emotions, and ideas are visually conveyed to the audience in a compelling way.
These techniques are not just technical tools they are creative elements that add depth, beauty, and impact to films. They help filmmakers craft visuals that not only captivate the eye but also enhance the audience’s understanding of the story and foster an emotional connection. Without the intelligent use of these techniques, a film cannot reach its full cinematic potential.
From creating aesthetic effects to supporting the narrative, the role of cinematography techniques is essential. It’s important to note the difference between cinematography techniques and the fundamental elements of cinematography. Cinematography techniques involve the methods, skills, and styles that a cinematographer employs to evoke a particular feeling or effect. They are often creative and context-specific, tailored to the goals of the film.
On the other hand, the fundamental elements of cinematography, which we discussed previously, are the basic building blocks of filming that must be considered in every project. Without a solid foundation in these elements, even the most advanced techniques cannot deliver the desired results.
When discussing the difference between cinematography techniques and the fundamental elements of cinematography, it should be noted that: the core elements are the rules and foundational principles that define the framework of filmmaking, while techniques are the creative tools a cinematographer uses to bring these elements to life. In short, the fundamental elements form the foundation of cinematography, and techniques are the tools to enhance and execute them.
Now, let’s move on to cinematography techniques and examine them in detail:
Camera Movement Techniques:
Pan Technique: Horizontal Camera Movement on a Fixed Axis
The pan in cinematography refers to the horizontal movement of the camera, typically used to follow a subject or reveal the surrounding environment. In this technique, the camera remains in a fixed position, rotating horizontally from right to left or vice versa.
Features and Uses of the Pan:

Following the Subject: The pan is often used to track a moving subject within a scene, such as a person walking or a vehicle in motion.
Creating a Sense of Space and Environment: A pan can help the audience perceive the size and layout of a location for example, showing a wide landscape or moving from one point to another within a scene.
Tension or Shifts in Perspective: The speed of a pan can evoke different emotions. A fast pan can create a sense of anxiety or excitement, while a slow pan can draw attention to details.
Transition Between Characters or Objects: Panning can guide the viewer’s attention from one character to another or from one object to another, making visual transitions smooth and engaging.
Overall, the pan is a fundamental cinematic technique that allows filmmakers to convey the story with movement and heightened attention to detail.
Tilt Technique: Vertical Camera Movement
The tilt in cinematography refers to the vertical movement of the camera. In this technique, the camera moves up or down while remaining in a fixed position, rotating around a vertical axis.
Features and Uses of the Tilt:
Showing Height or Depth: One of the main uses of the tilt is to emphasize differences in height or depth within a scene. For example, tilting the camera upward can make a character appear prominent or powerful, while tilting downward can reduce the sense of authority or dominance.
Drawing Attention: Tilts can be used to focus the viewer’s attention on a specific element in the frame. For instance, moving the camera from a low angle upward can highlight a particular object or a key character.
Gradual Revelation of Information: With tilting, details of a character or environment can be revealed gradually. This technique is effective for highlighting physical features or creating a sense of discovery.
Creating Tension or Excitement: Like other camera movement techniques, tilts can generate tension or excitement within a scene. A quick tilt from bottom to top (or vice versa) can make the audience feel anxious or thrilled.
Showcasing Specific Positions: Tilts are also used to present particular locations or scenarios in a film, such as a tall building, a character in a position of power, or a looming threat (like a large creature seen from below).
Overall, the tilt is a fundamental and impactful cinematic technique that allows filmmakers to convey perspective and emotion to the audience.
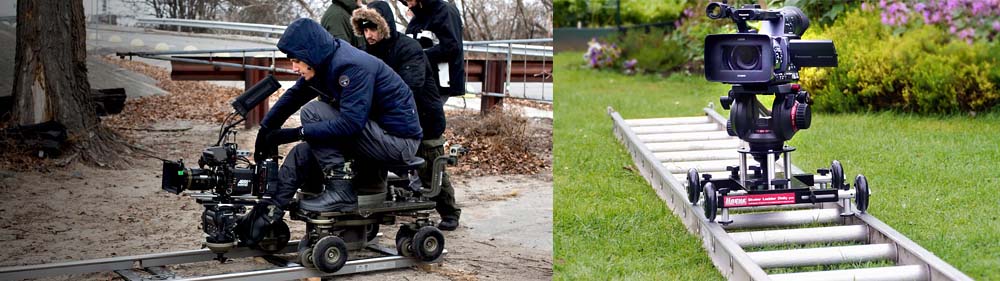
Dolly Technique: Camera Movement on Rails to Approach or Retreat from the Subject
The dolly (or Dolly Zoom / Zolly) in cinematography refers to the physical movement of the camera, either horizontally or vertically. In this technique, the camera is mounted on a rail or a specialized device called a dolly (similar to a small wagon) and moves smoothly along it. This movement can be forward, backward, or sideways.
Features and Uses of the Dolly:
Moving Alongside the Subject: One of the most common uses of the dolly is to move the camera alongside a subject. For example, when a subject is in motion, the camera can travel directly with it to maintain a close connection. This technique is often used to create a sense of following or accompanying the subject.
Creating Depth and Spatial Awareness: Dolly movements are frequently used to add depth to a shot. For instance, moving the camera backward can convey the size and scale of a location, while moving it forward can draw the viewer’s attention toward a specific subject.
Transitioning Between Scenes or Characters: Dollies can be used to move seamlessly between positions, scenes, or characters. These movements can guide the audience naturally from one situation to another.
Generating Suspense and Excitement: Dolly shots can heighten tension or excitement within a scene. For example, a forward dolly can create a sense of approaching danger or emphasize a critical moment.
Famous Examples of Dolly Shots: One of the most iconic uses of the dolly is when the camera slowly moves toward a subject to focus the viewer’s attention. In genres like horror or action, dolly movements are often used to show rapid subject motion or build tension. Overall, the dolly allows filmmakers to convey their narrative smoothly and naturally, using physical camera movement to create a closer and more precise interaction with subjects and spaces.
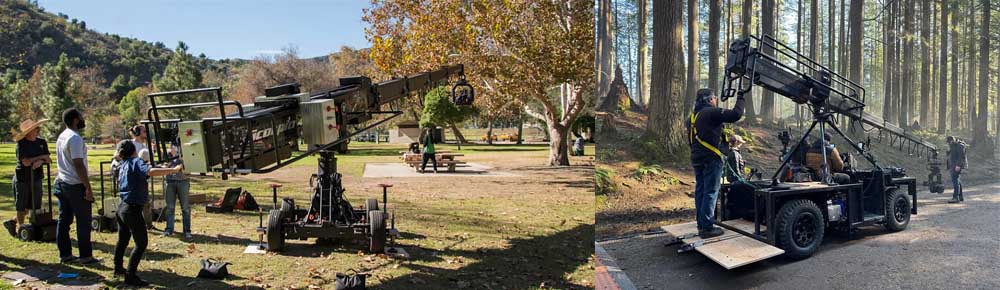
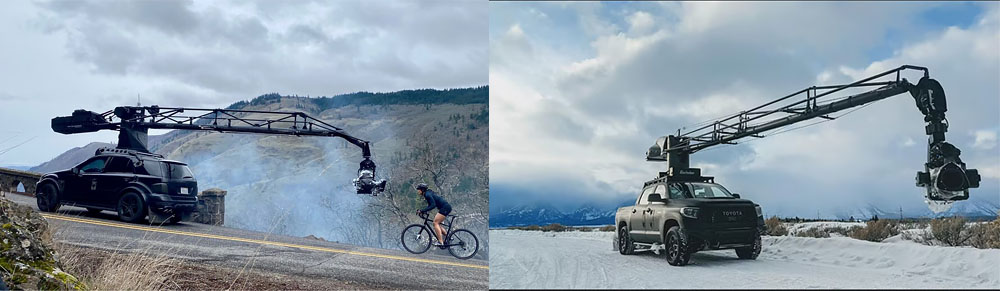
Crane Technique: Camera Movement Using a Crane for High and Dynamic Shots
The crane in cinematography refers to vertical or complex camera movements achieved with a crane device. In this technique, the camera is usually mounted on a long, movable arm and can move vertically, horizontally, or even at an angle.
This movement can occur in any direction—up, down, forward, backward, or in combination. The crane camera can also be attached to specialized machines, often called dolly cranes, which allow horizontal movement along rails or the ground. Combined with the movable arm, this setup enables smooth, complex, multi-axis camera movements.
This combination is particularly useful in scenes that require simultaneous movement across multiple axes, such as tracking a subject across a wide space or creating dynamic shots in action sequences.
Features and Uses of the Crane:
Vertical Movement and Overview Shots: One of the standout features of the crane is its ability to move the camera up or down. This vertical movement can be used to showcase differences in height, create wide, comprehensive shots of a location, or emphasize the scale of various spaces. For example, tilting the camera upward can make a subject appear prominent or convey a sense of grandeur and majesty.
Creating a Sense of Motion and Dynamics: The crane allows a static angle to transform into a dynamic movement. This movement can be horizontal or vertical, creating a sensation of fast or slow motion within the scene. It is ideal for transitioning from one subject to another or changing perspectives in a large, complex space.
Showcasing Landscapes and Specific Locations: Cranes enable filmmakers to capture expansive views, such as an entire cityscape or vast natural environments. They can also be used for top-down shots to present a location or situation from a dominant, comprehensive perspective.
Generating Excitement and Suspense: Crane movements can heighten tension and suspense in action or dramatic sequences. For example, a fast downward movement can create a sense of falling or approaching danger.
Smooth Transitions Between Spaces or Times: Using a crane, filmmakers can move smoothly between different spaces or time periods without cutting, allowing natural transitions between characters, locations, and sets, maintaining continuity and flow.
Application in Large-Scale Productions: This technique is particularly popular in big-budget films and complex sequences, such as historical or epic movies, because it effectively conveys a sense of scale and grandeur.
Overall, the crane is a powerful and flexible tool in cinematography, enabling filmmakers to present scenes from new and varied angles, and to visually connect subjects and environments in a cinematic and striking way.
Using the Dolly Crane (Specialized Dolly Machines)
Using a Dolly Crane in cinematography involves several key steps, adjusted according to the scene and the director’s requirements. Here’s the typical process:
-
Designing and Planning the Movement: The crew first determines the camera’s movement path based on the scene’s needs. For complex paths, a dolly rail may be used to ensure completely smooth and controlled motion.
-
Setting Up the Equipment: The crane arm is mounted on the dolly, and the camera is attached to the crane’s movable head, which allows rotation, tilting, and vertical movement. A control system such as a joystick or mechanical handles is installed to operate these movements.
-
Coordinated Dolly and Crane Movement: The dolly provides horizontal movement along the ground or rails, while the crane enables vertical movement and angle adjustments. The camera operator and crane assistant must work in perfect coordination to achieve smooth and seamless motion.
-
Advanced Motion Control: Using motorized or electronic systems allows for more precise movements. Modern technology, such as remote-controlled heads, can synchronize camera movements without any shaking.
-
Primary Applications:
-
Tracking Shots: Moving through large spaces like streets or forest paths.
-
Dynamic, Cinematic Shots: Moving from high to low angles or vice versa.
-
Creating Depth and Dimension: Combining horizontal and vertical movements to add visual interest to the scene.
-
Testing and Coordination: Before filming, all movements must be rehearsed and tested multiple times to ensure that every component—camera, dolly, crane, and operators—works in perfect harmony, preventing errors or vibrations. This technique is especially popular in action, historical, or musical scenes, producing striking cinematic effects.
Steadicam Technique: Using a Stabilizing System for Smooth Motion
The Steadicam in cinematography refers to a specialized camera system that allows the cinematographer to move while keeping the camera steady, eliminating shakes or jitters. This system uses a harness and balance mechanism to attach the camera to the operator’s body, enabling smooth shots even during fast movement or in challenging environments.
Features and Uses of the Steadicam:
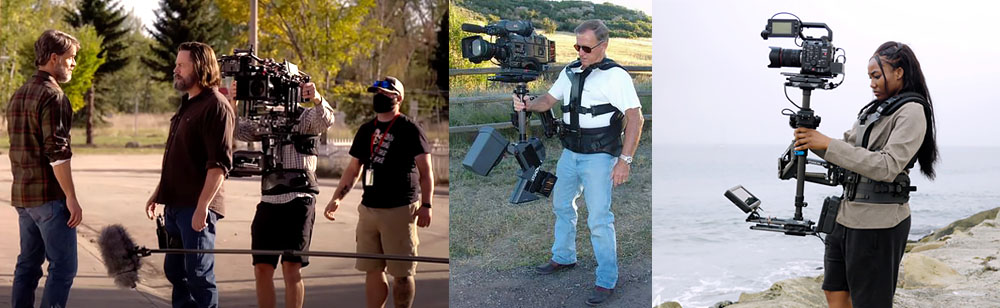
Smooth Camera Movement: One of the most important features of the Steadicam is that it allows the cinematographer to move the camera smoothly and without shake in various environments. This system is the best option for moving shots when using a dolly or crane is difficult.
Creating a Sense of Presence and Connection with Characters: The Steadicam allows the camera to follow characters, giving the audience a stronger sense of presence. Especially in scenes with moving subjects, this technique naturally conveys closeness and engagement, making viewers feel as if they are moving alongside the characters.
Use in Complex and Challenging Scenes: The Steadicam is highly effective in scenes requiring fast movements or in tight spaces, such as narrow hallways, staircases, or complicated action sequences. The system can easily navigate these conditions while keeping the image stable, even during sudden changes in direction.
Generating Suspense and Excitement: In action or thrilling sequences, the Steadicam can capture energetic, fast camera movements without shaking, helping to build tension or excitement. In horror or suspense films, it is often used to create a sense of pursuit and suspense.
Versatility in Filming: The Steadicam gives the operator great freedom, allowing horizontal, vertical, or combined movements. It is especially useful in films that require precise and rapid tracking of subjects.
Famous Examples of Steadicam Use: One of the most iconic uses of the Steadicam is in Stanley Kubrick’s The Shining, where the camera smoothly and continuously follows characters through hotel corridors. Similarly, in Martin Scorsese’s Goodfellas, the Steadicam is used to capture complex movements in bar and restaurant scenes. Overall, the Steadicam is an essential and powerful tool in modern cinematography, enabling filmmakers to record camera movements simultaneously with the subjects in various environments, creating a more realistic sense of presence and interaction with the film world.
Camera Angle Techniques
High Angle Shot: Filming from above the subject to show weakness or smallness
A high angle shot places the camera above the subject, looking downward. This perspective makes the subject appear smaller and often weaker.
Features and Uses of High Angle Shots:
Creating a Sense of Power or Weakness: One of the main uses of a high-angle shot is to convey feelings such as vulnerability, weakness, or exposure. When the camera looks down on the subject, the subject typically appears smaller, which can communicate weakness, fear, or helplessness to the audience. This technique is often used to depict characters in difficult situations or in positions of disadvantage.
Showing Control or Dominance: High-angle shots can also convey dominance or authority. For instance, when a character is in a position of power or controlling a larger environment, filming from above can emphasize that sense of control and superiority to the viewer.
Displaying Wide or Expansive Spaces: High-angle shots are effective for showing large areas or expansive environments. This type of shot can convey scale, dimension, or a broader perspective. In epic or war films, for example, high-angle shots are frequently used to depict vast battlefields or wide natural landscapes.
Creating a Sense of Observation or Omniscience: A high-angle perspective can subconsciously make the audience feel like they are observing or monitoring events from above. It can act as a visual tool to create a sense of distance or indirect engagement between the viewer and the characters.
Enhancing Visual and Dramatic Impact: High-angle shots can also be used to create striking visual and dramatic effects. Filmmakers can emphasize the importance of a particular situation and increase the emotional or dramatic weight of a scene.
Famous Examples:
-
In Braveheart, when the main character looks down from the top of a hill onto the battlefield, the high-angle shot conveys dominance and control.
-
In Sin City, high-angle shots are used to create a sense of violence and oppressive authority.
Overall, high-angle shots are a powerful tool that allows filmmakers to use changes in perspective to evoke different emotions and meanings, giving audiences a new way to view the characters or environment.
Low Angle Shot: Filming from Below to Show Power or Importance
A low-angle shot places the camera below the subject, looking upward. This perspective makes the subject appear larger, more prominent, and often more powerful.
Features and Uses of Low-Angle Shots:
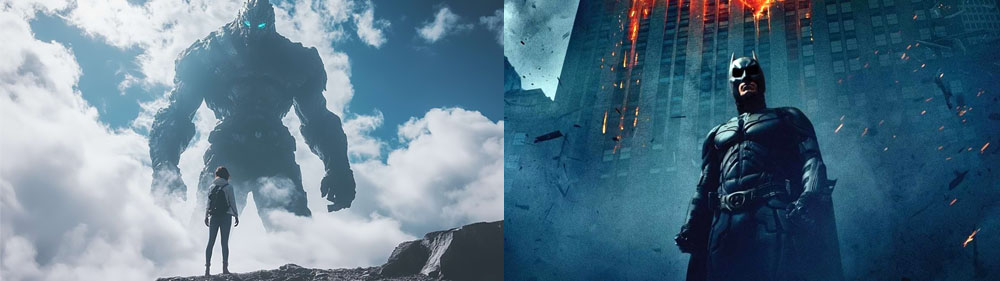
Creating a Sense of Power and Dominance: One of the main uses of a low-angle shot is to convey power, grandeur, and dominance. When the camera looks up at a subject, it appears larger and more significant. This technique is often used to depict powerful, rebellious characters or heroes.
Highlighting Features or Grandeur: Low-angle shots can emphasize particular attributes of a subject, such as size, physical strength, or distinctive features. For example, large characters or massive creatures appear more imposing and striking in these shots.
Enhancing Visual and Dramatic Impact: Low-angle shots create a stronger visual effect. They are especially useful in action, epic, or dramatic scenes to increase the intensity and power of the subject, giving the audience a sense of awe or excitement.
Creating a Sense of Threat or Fear: When used to depict villains, threatening figures, or scary characters, low-angle shots can instill a sense of danger or fear in viewers. In horror or action films, this technique emphasizes the “bigger and more threatening” presence of a subject.
Psychological Impact: Low-angle shots subconsciously give viewers the impression that the subject is dominant and in control. This helps portray characters as more formidable and powerful.
Famous Examples:
-
In Batman, low-angle shots effectively convey Batman’s power and imposing presence, making him appear larger and more fearsome.
-
In Iron Man, low-angle shots showcase the grandeur and strength of the Iron Man suit, emphasizing the character’s power.
Overall, the low-angle shot is a powerful tool that allows filmmakers to make characters or scenes appear larger, stronger, and more dominant, creating various emotional and visual effects for the audience.
Eye-Level Shot: Placing the Camera at the Subject’s Eye Level for a Natural Perspective
An eye-level shot places the camera at the same height as the subject’s eyes. In this type of shot, the camera faces the subject directly and maintains a neutral angle, neither looking up nor down. This perspective creates a sense of balance and naturalism in the image.
Features and Uses of Eye-Level Shots:
-
Conveying Reality and Naturalism: Eye-level shots are often used to create a sense of realism. This angle allows the audience to view events and characters from a normal human perspective without visual distortion or exaggeration.
-
Bringing the Viewer Closer to the Subject: Because it preserves realism and avoids distortion, the eye-level angle can create a stronger connection between the audience and the characters or events.
Eye-Level Shot (continued):
-
Immersive Perspective: The audience feels as though they are directly present in the scene, observing and interacting with the subjects.
-
Narrative Neutrality: Another feature of the eye-level shot is its neutrality; it does not offer any judgment or evaluation of the subject or situation. For this reason, it is often used in dramas or objective storytelling to present events realistically without distortion.
-
Maintaining Balance and Stability: In an eye-level shot, there is no exaggeration or diminishment in the subject’s perspective, which preserves a sense of visual balance and equilibrium. This is particularly useful in films that aim for calmness and consistency in storytelling.
-
Ease of Understanding and Following the Story: Because this shot feels natural, viewers can easily immerse themselves in the narrative, focusing on the characters and events. It is often used in scenes that aim to convey information clearly and directly.
Famous Examples:
-
In dramas like The Pursuit of Happyness or Braveheart, eye-level shots are used to capture human and emotional moments, allowing the audience to empathize and connect with the characters.
-
In documentaries, eye-level shots are frequently employed to maintain a sense of realism and deliver information neutrally.
Overall, the eye-level technique is one of the simplest yet most effective cinematography methods, enabling filmmakers to present images and stories naturally, realistically, and without exaggeration.
Focus Techniques
Deep Focus: Foreground and Background Both in Sharp Focus
Deep Focus refers to the use of an extremely large depth of field in which all elements of a scene from the nearest objects to the farthest remain in focus simultaneously. Even when subjects are at different distances from the camera, everything remains sharp and visible. This technique is usually achieved with a small aperture (to create a large depth of field) and specific lenses.
Features and Uses of Deep Focus:
Deep Focus:
-
Showing Expansive and Complex Spaces: Deep focus allows filmmakers to keep all elements of a scene in the viewer’s attention simultaneously. Especially in busy, detail-rich scenes, this technique helps depict the multiple dimensions of the film’s space, ensuring that every part of the scene is visible at once.
-
Creating Connections Between Subjects and Environment: Deep focus can be used to visually link subjects with their surroundings. For example, if the main character is close to the camera while an important element exists in the background, deep focus keeps everything sharply visible, strengthening the relationship between the character and the environment.
-
Enhancing Visual and Dramatic Impact: This technique can increase a scene’s dramatic effect. With deep focus, the audience can simultaneously notice multiple aspects of the scene, and because everything is in focus, they can absorb all the visual information. This can be particularly useful for adding dramatic complexity or subtle meaning to the imagery.
-
Showing More Detail and Richness: Deep focus enables filmmakers to display more details in a scene, especially when they want to concentrate on multiple subjects at the same time. For example, during a dialogue scene, deep focus allows both characters near the camera and those in the background to remain sharp simultaneously.
Famous Examples:
-
In Orson Welles’ Citizen Kane, deep focus is used extensively to display multiple details simultaneously. A famous scene shows characters positioned in different parts of a room, all in focus at the same time.
-
In Christopher Nolan’s Inception, deep focus is used in some scenes to depict multiple layers of reality at once.
Overall, deep focus is a powerful cinematography tool that allows filmmakers to present complex, multi-layered scenes visually and dramatically, enabling viewers to notice and engage with all details and elements of a scene.
Shallow Focus: Only Part of the Image is Sharp, the Rest is Blurred
Shallow focus uses a limited depth of field, where only a portion of the scene is in sharp focus while the rest is softly blurred. Usually, only the subject closest to the camera or the focal point remains crisp and detailed, while background or distant elements appear out of focus (bokeh).
Features and Uses of Shallow Focus:
Shallow Focus:
-
Emphasizing a Specific Subject: Shallow focus allows filmmakers to direct the viewer’s attention to a particular subject. By blurring the background or other elements, all focus is placed on the subject, making this technique especially useful in dramatic or emotionally charged scenes.
-
Enhancing Intimacy and Closeness: When only the main subject is in focus while the rest is blurred, it creates a sense of proximity for the audience, fostering feelings of intimacy or emotional intensity. This is often used in romantic or personal scenes to draw viewers closer to the characters.
-
Eliminating Distractions: Shallow focus can reduce or remove unnecessary background details, ensuring that only what is important for the story or current moment is emphasized, keeping the audience’s attention on the key elements.
-
Adding Dramatic or Narrative Meaning: This technique can also create dramatic impact or convey subtle meanings. For instance, in mystery films, when a character is in focus and the background is blurred, it can evoke feelings of isolation, deception, or uncertainty.
-
Use in Portraits: Shallow focus is popular in portrait cinematography. By blurring the background, filmmakers can highlight facial features or expressions, making it especially effective in dramas or biographical films to showcase emotional or psychological details.
Famous Examples:
-
In Sofia Coppola’s Lost in Translation, shallow focus is used to create a sense of intimacy and closeness between the two main characters, strengthening their emotional connection.
-
In Alejandro González Iñárritu’s The Revenant, shallow focus is employed in scenes set in wild, natural environments to highlight the emotions and reactions of the characters.
Overall, shallow focus is a key technique filmmakers use to guide audience attention, evoke specific emotions, and enhance the dramatic qualities of a scene. It is particularly effective when highlighting a subject or altering the visual impact of a shot.
Rack Focus: Shifting Focus Between Subjects in a Single Shot
Rack focus is a cinematography technique where the focus shifts during a shot, usually from one subject to another or between different areas of a scene. This sudden change directs the viewer’s attention from one point to another. Rack focus is achieved by adjusting the lens settings and is typically used to emphasize specific elements of a scene or to create narrative shifts.
Features and Uses of Rack Focus:
Rack Focus: Shifting Focus Between Subjects in a Single Shot
-
Directing Attention to a New Subject: Rack focus is typically used when a filmmaker wants to shift the viewer’s attention from one subject to another. For example, if two characters are talking in a scene and one suddenly becomes more significant, shifting the focus from the first character to the second visually and psychologically guides the audience’s perception.
-
Creating Tension and Drama: Rack focus can build tension and drama within a scene. Abruptly changing focus from an insignificant detail to something critical or threatening can evoke anxiety or shock in the viewer. This technique is particularly effective in mystery, thriller, or horror films to reveal hidden details or shifts in character dynamics.
-
Showing Relationships Between Scene Elements: Rack focus can illustrate connections between different elements of a scene or story. For instance, if an important object is in the background and suddenly a character interacting with that object comes into focus, the shift establishes a meaningful visual link between the two.
-
Adding Visual Layers: Rack focus can also enhance the visual depth of a scene. By shifting focus between different elements, filmmakers create a more dynamic, layered, and immersive image.
-
Emphasizing Details and Aesthetic Features: This technique can highlight specific details in artistic or visually striking scenes. For example, a filmmaker may initially present an object as unimportant, but when the focus shifts to it, its narrative or visual significance becomes clear.
Famous Examples:
-
In Citizen Kane (directed by Orson Welles), rack focus is effectively used to connect different scene elements and highlight narrative significance. For example, focus often shifts from an object to a character to indicate its importance to the story.
-
In The Pianist (directed by Roman Polanski), rack focus is employed to build tension and show the character’s surroundings. The focus shifts between the protagonist and the environment, particularly in critical moments, intensifying the psychological pressure on the audience.
Overall, rack focus is a powerful cinematic tool that allows filmmakers to guide the viewer’s attention visually and psychologically, producing dramatic, narrative, and visual effects that enrich the storytelling experience.
Lighting techniques:
Three-Point Lighting: Key, Fill, and Back Light
The Three-Point Lighting technique is one of the most fundamental and widely used methods in cinematography and photography. It is especially effective for illuminating a subject in a balanced and natural way. This technique consists of three main light sources, each with a specific role in lighting the subject: Key Light, Fill Light, and Back Light.
Components of Three-Point Lighting:
-
Key Light:
-
The primary and strongest light source.
-
Defines the subject’s overall shape, contours, and main shadows.
-
Sets the tone, mood, and contrast of the scene.
-
-
Fill Light:
-
A secondary light source that softens or reduces shadows created by the key light.
-
Prevents the scene from appearing too harsh or contrast-heavy.
-
Helps maintain visual clarity and balance in the image.
-
-
Back Light (or Rim Light):
-
Placed behind the subject, often at a higher angle.
-
Separates the subject from the background by creating a subtle rim or halo effect.
-
Adds depth, dimension, and a sense of three-dimensionality to the scene.
-
Applications and Benefits:
-
Achieves natural, balanced lighting suitable for interviews, portraits, and dramatic scenes.
-
Allows filmmakers to control mood, emphasize textures, and guide the audience’s visual focus.
-
Versatile for both indoor and controlled outdoor environments.
Key Light
The Key Light is the primary light source in a scene, mainly illuminating the subject. It is usually positioned at a specific angle (commonly from one side of the subject).
Role: The key light creates shadows, textures, and depth in the image, and it has the most significant impact on the subject’s appearance.
Characteristics:
-
Its intensity is generally higher than the other two lights.
-
It can be positioned from various directions, especially from an angle that adds depth to the subject.
-
In cinematic lighting, the key light can be either hard or soft, depending on the dramatic effect and mood the filmmaker wants to create.
Fill Light
The Fill Light is used to reduce or soften the shadows created by the key light.
Role: It eliminates harsh shadows and reveals more details of the subject. The fill light usually has less intensity than the key light and can be placed from the same or opposite direction of the key light.
Characteristics:
-
Fill light is often created using soft light sources (like softboxes or reflectors) to ensure shadows are gentle.
-
Its purpose is to maintain balance in the image so that the subject appears natural and clearly visible, without harsh shadows or overly dark areas.
Back Light (Rim Light)
The Back Light, also called Rim Light, shines from behind the subject, typically to illuminate the edges or create a separation between the subject and the background.
Role: The back light separates the subject from the background, adding depth to the image. It also enhances the three-dimensional feel and prominence of the subject.
Characteristics:
-
Usually placed above or behind the subject.
-
Can create dramatic effects on the subject.
-
Typically softer and less intense than the key light.
Applications of Three-Point Lighting
-
Creating Depth and Dimension:
Combining key, fill, and back lights adds depth to the subject. The key light casts shadows showing depth, the fill light softens these shadows, and the back light separates the subject from the background. -
Maintaining Light Balance:
Three-point lighting allows for balanced light distribution in the scene. The key light highlights the subject, the fill light softens shadows, and the back light enhances the sense of space. -
Setting Mood or Atmosphere:
The intensity and angle of lights significantly affect the scene’s mood. For example, a strong key light with weak fill light can create tension and drama, while softer lighting can convey calmness or intimacy. -
Portraits:
Three-point lighting is a core technique in portrait cinematography, especially effective for creating images where the subject is clear, prominent, and visually appealing.
Famous Examples of Three-Point Lighting
In classic Hollywood films such as 42 (Meet Jackie Robinson) and The Godfather, three-point lighting was used to create precise and balanced images. In many drama and documentary films, this lighting technique highlights the facial features of characters and generates emotional and dramatic impact.
Conclusion: Three-point lighting is a fundamental technique that, by using three primary light sources, effectively and evenly illuminates subjects, adds depth and spatial dimension, and produces various dramatic effects. It allows filmmakers to craft images that are visually accurate and in harmony with the story’s mood and narrative needs.
High Contrast Lighting
High Contrast Lighting refers to the use of strong differences between light and shadow within a scene. In this technique, the bright areas are very bright while the dark areas are very dark, creating an intense visual separation.
Purpose and Effect:
-
Produces dramatic tension and mood.
-
Emphasizes forms and textures, making elements in the scene stand out sharply.
-
Often used to convey emotional intensity or highlight conflict and suspense.
Applications:
-
In thrillers or film noir, high contrast lighting can create a sense of mystery, danger, or psychological tension.
-
It is ideal for scenes where the director wants the audience to focus on specific elements while the rest fades into darkness.
-
Also used to evoke stylized or artistic visuals, enhancing the cinematic language of the film.
High Contrast Lighting
High contrast lighting refers to the use of extreme differences between light and shadow within a scene. In this technique, some areas of the frame are intensely bright while others are plunged into deep darkness. This stark contrast creates striking visual layers and makes the scene more dramatic.
Key Features and Effects:
-
Strong visual distinction: Bright highlights and deep shadows make objects and characters stand out sharply.
-
Mood creation: High contrast often generates tension, fear, or drama. It is particularly effective in crime, thriller, and mystery films, where the interplay of light and shadow conveys psychological intensity.
-
Character and story emphasis: Shadows can indicate secrecy, tension, or inner turmoil, while bright areas may symbolize hope, purity, or clarity.
-
Visual style: High contrast is commonly used in black-and-white films and film noir, where dramatic shadows and sharp lighting define the visual identity and create a stylized cinematic look.
-
Enhanced visual separation: It allows the filmmaker to clearly differentiate objects, characters, and elements within the scene.
Famous Examples:
-
Film Noir: Movies like Double Indemnity and Touch of Evil use high contrast lighting to enhance suspense, mystery, and fear. Deep shadows and intense highlights are central to their visual style.
-
Horror Films: In films such as The Thing, high contrast emphasizes fear and tension, using stark shadows and bright areas to heighten suspense.
-
Classic Black-and-White Films: Citizen Kane utilizes high contrast to accentuate visual and emotional layers, highlighting the depth of characters and story.
Conclusion: High contrast lighting is a powerful tool that can create the most dramatic and intense visual effects in cinema. By emphasizing the interplay between light and shadow, it conveys mood and emotion, especially in genres like noir, horror, and crime, leaving a strong, lasting impression on the audience.
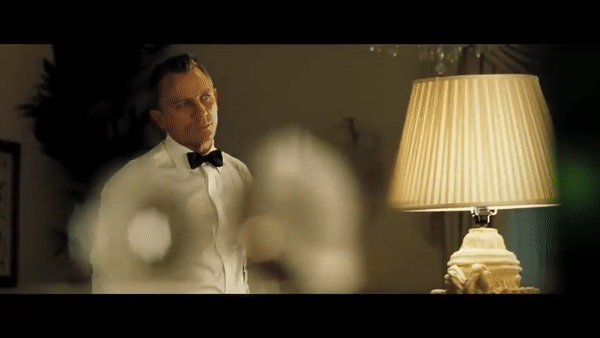
Natural Lighting
Natural lighting refers to using ambient or existing light sources in the environment, such as sunlight, moonlight, or interior lighting from windows and street lamps, to illuminate a scene. The goal is to achieve a realistic, organic look without relying on artificial lighting setups.
Key Features and Applications:
-
Realism: Provides a true-to-life visual quality that feels natural and believable.
-
Integration with environment: Light comes from the scene itself, enhancing the authenticity of locations and settings.
-
Subtlety: Avoids artificial highlights or shadows, allowing the natural mood and atmosphere of the environment to shape the scene.
-
Flexibility: Often combined with reflectors or minimal artificial sources to subtly enhance shadows and highlights while maintaining realism.
Natural Lighting
Natural lighting refers to using existing environmental light sources—such as sunlight, moonlight, or ambient artificial light (like street lamps or indoor lighting from windows)—to illuminate a scene. This technique emphasizes realism and allows the filmmaker to capture the environment as it naturally appears.
Key Features and Effects:
-
Realistic and natural feel: Natural light gives the scene a sense of authenticity and spontaneity. Because it originates from real-world sources, it can convey honesty and a natural flow in storytelling. This makes it highly suitable for documentaries and films aiming for realism.
-
Use of sunlight: One of the most common sources of natural light is the sun. Filmmakers can leverage different times of day soft morning light, warm sunset light to create specific moods and atmospheres. Outdoor daylight often provides soft, natural illumination that enhances realism.
-
Variation in mood and tone: Natural light changes depending on time, weather, and location. For example, midday sunlight can be intense with sharp shadows, while sunrise or sunset produces warmer, softer light, evoking nostalgia or calmness.
-
Minimal intervention: Natural lighting usually requires little manipulation, allowing filmmakers to rely on existing sources to illuminate their scenes efficiently. This makes it cost-effective and aesthetically authentic.
-
Ideal for documentaries and realistic dramas: In these genres, natural lighting reinforces a sense of truthfulness and credibility, capturing the environment and the subjects’ interactions in a genuine way.
Challenges and Limitations:
-
Limited control: Filmmakers cannot fully control natural light. Weather conditions, changing sunlight intensity, and variations in location or time of day can affect lighting quality.
-
Requires precise planning: Capturing the desired lighting often depends on specific times or locations. Directors and cinematographers must carefully schedule shoots to achieve optimal natural light conditions.
-
Limited dramatic control: It may be difficult to create complex light and shadow layers or strong dramatic effects with natural light. It is typically better suited for soft, even illumination rather than high-contrast, stylized lighting.
Famous Examples:
-
The Godfather: Especially in night scenes, natural light from windows and the environment is used effectively to create atmosphere and realism, illuminating both interior and exterior spaces.
-
The Tree of Life (Terrence Malick): The film extensively uses sunlight in outdoor scenes, enhancing the spiritual and aesthetic qualities of the film.
-
Rain Man: Natural lighting, particularly in outdoor sequences, strengthens the authenticity of emotions and character interactions.
Conclusion: Natural lighting allows filmmakers to create realistic, authentic visuals by using the light sources already present in the environment. While it has limitations in control and dramatic shaping, it remains a powerful technique, especially in documentaries and realistic dramas, offering natural beauty, cost efficiency, and a strong sense of realism.
Shots techniques:
Close-Up (CU)
A close-up shot in filmmaking refers to framing the subject very tightly to capture fine details. This shot typically focuses on a character’s face, a significant object, or a crucial part of the scene to highlight emotions, expressions, or specific details. Close-ups are among the most powerful and impactful shots in cinema, allowing filmmakers to emphasize key elements of the story.
Key Features of Close-Ups:
-
Emphasis on emotions: Close-ups allow the audience to see subtle facial expressions, eye movements, or micro-expressions that convey deep emotional states. This makes them essential for dramatic and intimate moments.
-
Focus on important objects or details: Besides faces, close-ups can highlight a meaningful object, hand gesture, or small action that has narrative significance.
-
Isolation of the subject: By cropping out surrounding elements, close-ups remove distractions and direct the viewer’s full attention to the intended focus.
-
Enhanced storytelling impact: Close-ups amplify the narrative weight of a moment, making the scene feel more intense, personal, or significant.
-
Visual intimacy: This shot brings the audience closer to the characters or objects, fostering a sense of connection and involvement with the story.
Common Uses:
-
Emotional or pivotal scenes in dramas
-
Highlighting objects critical to the plot (like clues in a mystery or symbolic items)
-
Conveying tension, fear, or intimacy through facial expressions
Famous Examples:
-
In “Psycho” (Alfred Hitchcock), the close-up of Marion Crane’s eye during the shower scene intensifies suspense and horror.
-
In “The Godfather”, close-ups on Vito Corleone’s expressions convey power, thoughtfulness, and emotional depth.
-
In “Lost in Translation”, Sofia Coppola uses close-ups to capture the subtle emotional connection between the characters.
Conclusion:
Close-up shots are a vital tool in cinematography for emphasizing detail, emotion, and narrative importance. By isolating the subject and highlighting key elements, they allow filmmakers to create intimate, compelling, and memorable moments on screen.
Close-Up (CU)
Focus on Details:
A close-up zooms in on a specific subject to separate it from other elements in the scene, directing the audience’s attention to important details. These details can include facial expressions, eye movements, or even a small object that plays a crucial role in the story (such as a ring, key, or letter).
Expressing Emotions:
Close-ups are highly effective in conveying a character’s emotions and reactions. Subtle facial movements, tears, or even trembling lips can create a deep emotional impact. This shot brings the audience closer to the character, allowing a better understanding of their feelings.
Isolation from the Environment:
In a close-up, much of the background is cropped out so that all focus remains on the subject. This ensures the viewer’s attention is fully directed toward the intended element.
Types of Close-Ups:
-
Face Close-Up: Shows the character’s entire face to capture subtle emotional states.
-
Object Close-Up: Highlights a small object that plays a significant role in the story.
-
Extreme Close-Up (ECU): Focuses on a very small part of the subject, such as an eye, lips, or finger.
Uses of Close-Ups:
-
Creating Drama and Deep Emotion: Close-ups are often used during emotional or dramatic moments to maximize impact. For example, when a character is making a crucial decision or experiencing intense feelings like anger, fear, or grief.
-
Highlighting Story Details: Close-ups emphasize objects or details that are important to the narrative, such as a gun, a key, or a clue in a mystery.
-
Building Deeper Connection with Characters: This shot allows the audience to feel closer to the character and better understand their emotions and thoughts, fostering intimacy and personal connection.
-
Generating Tension and Suspense: In tense scenes, a close-up can heighten suspense, especially when focused on something that might change or trigger an event.
Famous Examples of Close-Ups:
-
Psycho (Alfred Hitchcock): In the iconic shower scene, close-ups of the victim’s face and struggling hands vividly convey terror, panic, and stress.
-
Se7en: The close-up of the box in the final scene amplifies suspense and drama, playing a key role in shocking and thrilling the audience.
-
The Godfather: Close-ups on characters like Michael Corleone capture inner emotions and critical decisions, emphasizing their psychological depth.
Close-ups are a cornerstone of cinematic storytelling, allowing filmmakers to emphasize details, emotions, and narrative significance. By isolating the subject and highlighting critical elements, this technique creates intimate, powerful, and memorable moments on screen.
Advantages and Challenges of Close-Ups
Advantages:
-
Emotional Impact: Close-ups allow filmmakers to portray characters’ emotions with precision and intensity.
-
Focus on Story: This shot emphasizes key story elements, presenting them clearly and prominently.
Challenges:
-
Overuse: Excessive use of close-ups can reduce their impact and potentially fatigue the audience.
-
Requires Strong Acting: Close-ups demand actors to deliver precise facial expressions and subtle emotional cues, as even minor movements are highly noticeable.
Conclusion:
Close-ups are a vital cinematography tool for highlighting emotions, details, and essential story elements. When used effectively, they create a deep sense of intimacy with characters and help audiences better understand the narrative. In key moments of a film, close-ups are an unparalleled device for emotional and dramatic impact, making them a cornerstone of cinematic language.
Long Shot (LS)
A long shot captures the subject (usually a character or object) fully within the frame while also showing a significant portion of the surrounding environment. In this shot, there is noticeable distance between the camera and the subject, allowing the audience to see both the character and their context simultaneously.
Purpose and Uses:
-
Introducing the Environment: Long shots are commonly used to establish the setting and give viewers a sense of space.
-
Emphasizing Relationship with the Environment: This shot can show how the subject interacts with or relates to their surroundings.
-
Displaying Movement and Action: Long shots are ideal for capturing actions, gestures, or interactions on a larger scale, providing spatial context.
Features of Long Shots:
-
Shows the full body of the character or the entirety of a key object.
-
Includes surrounding environment to give context and scale.
-
Provides perspective on the spatial relationship between characters and their setting.
-
Often used as an establishing shot or for scenes requiring visual storytelling across space.
Long Shot (LS)
Full Subject Display:
The main subject (e.g., a character) is fully visible from head to toe, while the frame is wide enough to show the surrounding environment clearly.
Purpose and Features:
-
Contextual Awareness: Helps the audience understand the subject’s relationship with the surrounding environment and experience the sense of scale or vastness.
-
Combining Movement and Space: Long shots are often used to show characters’ movement within a space or their interaction with the environment.
-
Balanced Composition: Unlike close-ups, which focus on facial or object details, long shots provide a broader perspective of the scene, drawing attention to multiple elements simultaneously.
Applications of Long Shots:
-
Introducing the Location: Often used at the beginning of scenes or during transitions to establish the setting and geographic context.
-
Emphasizing Subject-Environment Relationship: Highlights the smallness of a character within a large space (e.g., a desert, cityscape, or battlefield) or their interaction with the environment.
-
Highlighting Movement and Action: Ideal for action sequences, chase scenes, or moments where full-body movements and interactions with the environment are crucial.
-
Creating a Sense of Scale: Long shots enhance the perception of space or the significance of a subject. For example, in epic or war films, they are used to convey the vastness of a battlefield.
Comparison with Similar Shots:
-
Extreme Long Shot (ELS): The subject appears very small or almost blends into the background, with the primary focus on the environment or the scale of the scene.
-
Medium Shot (MS): The subject is closer to the camera, and the environment is less emphasized compared to a long shot.
Famous Examples of Long Shots:
-
Lawrence of Arabia: Desert scenes use long shots to emphasize the vastness of the desert and the smallness of the characters.
-
The Lord of the Rings: Long shots of characters’ journeys showcase natural landscapes and the sense of adventure.
-
The Shawshank Redemption: The iconic shot of Andy’s freedom in the rain uses a long shot to simultaneously display the character and the open environment.
Advantages of Long Shots:
-
Establishing Story Space: Helps the audience understand the narrative’s location and context.
-
Showing Subject-Environment Interaction: Depicts the relationship between characters and their surroundings.
-
Freedom of Camera Movement: Provides more space for dynamic camera movements and tracking shots.
Challenges of Long Shots:
-
Emotional Distance: Because they show a broad view, long shots may reduce the audience’s emotional connection with the character compared to close-ups.
-
Less Focus on Detail: Important facial expressions or small story elements may be harder to capture.
-
Composition Complexity: Requires careful framing to balance subject and environment while maintaining visual clarity.
Challenges of Long Shots:
-
Reduced Focus on Details: Facial expressions or subtle emotional cues of characters may not be clearly visible in this shot.
-
Requires Careful Set Design: To achieve the desired visual impact, the arrangement of the environment and scene composition must be meticulously planned.
Conclusion:
The long shot is a fundamental cinematic technique that conveys the subject’s relationship with the surrounding environment, giving the audience a sense of space and scale. It is highly effective for creating a sense of adventure, showing movement, and emphasizing the interactions between the subject and their environment. Filmmakers use long shots to draw attention to the broader elements of the story and to craft visually striking scenes.
POV Shot (Point of View)
Definition:
A POV shot is a common cinematographic technique in which the camera simulates the perspective of a character, allowing the audience to see events from that character’s point of view.
Features and Uses:
-
Emotional Connection: This shot allows the audience to feel closer to the character and experience events more directly.
-
Strengthening Narrative: POV is often used in scenes that aim to convey the character’s thoughts, perceptions, or subjective experience.
-
Flexibility: This technique can represent the perspective of a human, an animal, or even an object, depending on the story’s requirements.
POV Shot (Point of View):
The POV shot cannot be considered one of the core elements of cinematic cinematography, but it is an important and practical tool in the visual language of cinema. The fundamental elements of cinematography include composition, camera movement, camera angles, lighting, and depth of field.
Difference Between POV and Core Elements:
-
POV is a technique, not a fundamental element. It is primarily used as a storytelling or cinematic expression tool rather than something that is essential in every film.
-
Core cinematography elements are necessary for all types of films, whereas POV shots are used only when the narrative or story requires that perspective.
Thus, POV is an important part of filmmaking techniques but not as foundational or consistently required as the essential elements.
Examples:
-
In first-person narrative films like Hardcore Henry, where the entire movie is presented from the main character’s perspective.
-
In key moments of horror films, to show the perspective of a killer or a victim.
This technique is a powerful tool for creating empathy or suspense in films.
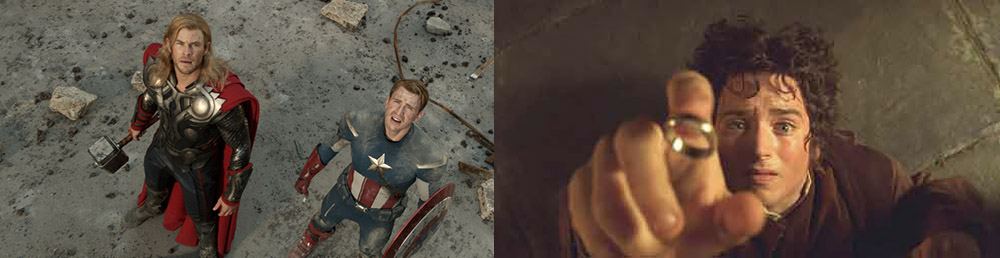
Extreme Close-Up (ECU) : Focusing on Very Small Details
The Extreme Close-Up is a powerful and striking cinematography technique in which a very small portion of the subject or a specific detail is shown. This shot is extremely close and often focuses on tiny details such as an eye, lips, hand, or even a small object.
Purpose:
The goal of this technique is to draw the audience’s full attention to these details and to convey a specific feeling or create a dramatic impact.
Features of Extreme Close-Up:
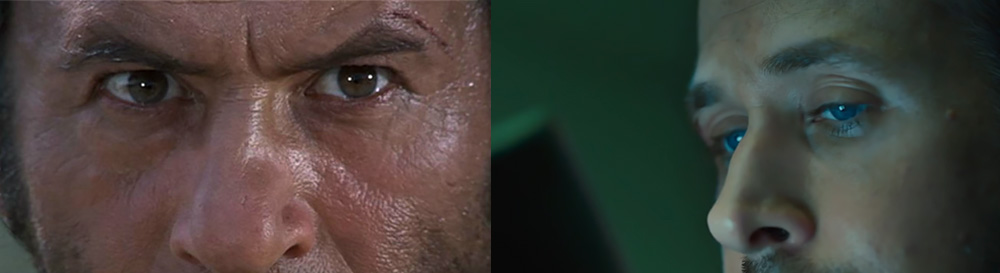
Extreme Close-Up (ECU): Focusing on Very Small Details
Precise Focus:
This shot highlights a very small portion of the scene or subject, such as a tear, a finger movement, or even a specific gaze.
Creating Intensity:
Extreme close-ups can amplify strong emotions like fear, excitement, or specific dramatic effects. This shot deeply engages the viewer.
Fine Details:
Details like the texture of an object (e.g., patterns on a ring) or small body movements (e.g., blinking) are often shown with this technique.
Isolation of Subject:
In this shot, the background and other scene elements are removed, directing all attention to the specific detail.
Applications of Extreme Close-Up:
-
Expressing Deep Emotions: Often used to depict complex emotional states. For example, a close-up of a character’s teary eye intensifies sorrow or grief.
-
Creating Suspense or Tension: In thriller or horror genres, ECUs emphasize small objects or movements to increase tension and suspense, such as a finger slowly pulling a trigger or a key turning in a lock.
-
Highlighting Story Details: This shot can be used to show a critical object or clue in the story, like a letter with a significant message or details on a fingerprint.
-
Visual Aesthetics: In some films, ECUs are used as a tool for aesthetic emphasis, displaying textures or artistic details, such as the gentle movement of a paintbrush on a canvas.
Famous Examples of Extreme Close-Up:
-
A Fistful of Dollars: Close-ups of the characters’ eyes during the final duel heighten suspense and focus on the intensity of the confrontation.
-
Psycho by Alfred Hitchcock: Close-ups of the shower drain and the flowing water and blood create a lasting impact on viewers.
-
The Lord of the Rings: Close-up shots of the ring and its intricate details emphasize both its narrative importance and visual beauty.
Advantages and Challenges of Extreme Close-Up:
Advantages:
-
Full Attention: This technique directs the audience’s focus entirely on a specific detail.
-
Enhanced Emotions: ECUs convey the characters’ emotions or key story moments more intensely.
-
Increased Dramatic Impact: In critical scenes, this shot maximizes emotional and narrative impact.
Disadvantages:
-
Limited Information: This shot overlooks fine details of the scene and may overshadow other narrative elements.
-
Risk of Overuse: If this technique is overused, it can become tedious for the audience or lose its impact.
Conclusion:
Extreme shots—whether Extreme Close-Up or Extreme Long Shot—are highly effective cinematography techniques. Extreme Close-Up focuses on very small details, allowing filmmakers to convey deep emotions, tension, or specific aesthetic qualities. When used appropriately and at the right moment, this shot becomes a powerful tool in a filmmaker’s hands, leaving a lasting impression and creating unforgettable cinematic moments.
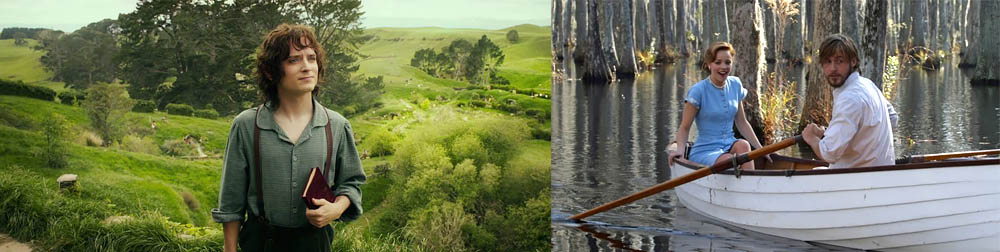
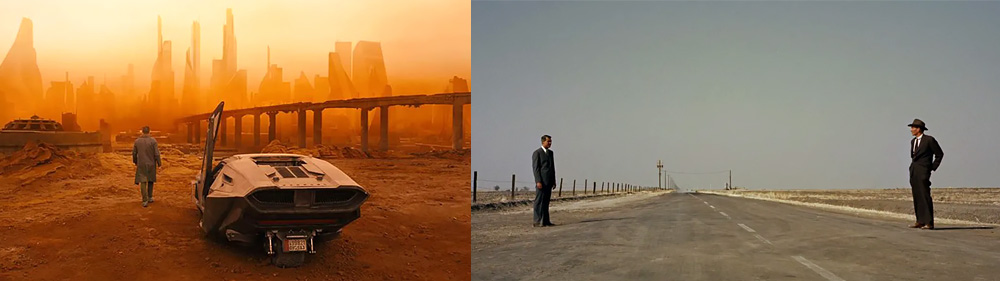
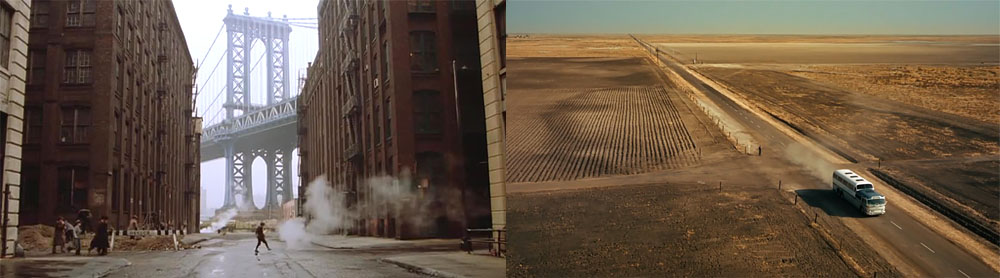
Extreme Long Shot (ELS): Emphasis on Environment and Location Over the Subject
Definition:
The Extreme Long Shot is a cinematography technique where the camera is positioned at a very large distance from the subject or scene. This shot is primarily used to showcase the environment, setting, or vast landscapes. In this type of shot, the main subject usually appears very small relative to the surrounding space, placing the focus more on the environment and location than on the subject itself.
Key Features of Extreme Long Shot:
-
Emphasis on Space and Scale: The subject is small, highlighting the vastness of the environment or setting.
-
Contextual Awareness: Provides viewers with a sense of the subject’s location, surroundings, and position within the larger scene.
-
Dramatic or Epic Effect: Often used in epic, adventure, or war films to convey the grandeur or scale of landscapes and settings.
-
Visual Storytelling: Helps communicate the relationship between the character and their environment, emphasizing isolation, vulnerability, or significance within the scene.
Extreme Long Shot (ELS): Emphasis on Environment and Spatial Context
Characteristics:
-
Wide and Expansive View: This shot is typically used to showcase large landscapes, natural sceneries, cities, or expansive locations.
-
Less Focus on the Subject: The subject may appear very small or distant from the camera, with emphasis placed on the surrounding environment rather than the subject itself.
-
Sense of Scale: ELS helps filmmakers convey the magnitude or smallness of a character, object, or location. For example, in action or sci-fi films, it is used to highlight large threats or futuristic landscapes.
-
Feeling of Isolation or Loneliness: These shots can communicate emotions like solitude, isolation, or a character’s vulnerability in a vast, unfamiliar environment.
Famous Examples of Extreme Long Shot:
-
"Lawrence of Arabia" (1962), Director: David Lean
-
Notable Scene: Vast desert landscapes of Saudi Arabia. The protagonist (played by Peter O’Toole as Lawrence) appears tiny against the endless desert, emphasizing loneliness, inner struggles, and the immense scale of nature.
-
-
"2001: A Space Odyssey" (1968), Director: Stanley Kubrick
-
Notable Scene: Scenes in outer space beside massive spacecrafts. In one iconic shot, the spaceship Discovery One appears small against the infinite expanse of galaxies and planets, effectively conveying the immensity of space and human vulnerability.
-
-
"The Good, The Bad, and The Ugly" (1966), Director: Sergio Leone
-
Notable Scene: In this Spaghetti Western, Leone frequently uses extreme long shots to showcase vast desert landscapes. Iconic standoff scenes in wide plains display the characters in relation to the immense environment, enhancing tension, scale, and the human-environment relationship.
-
Uses of Extreme Long Shot:
-
Showcasing Nature or Open Environments: Used in films involving travel, exploration, or vast natural/space settings to convey the grandeur of the environment.
-
Introducing a Location: Often employed to introduce new locations or landscapes, helping the audience understand the scale and geography of a large area.
-
Creating Atmosphere: In genres like Westerns, action, or sci-fi, ELS helps emphasize suspenseful, thrilling, or dramatic atmospheres.
Extreme Long Shot is a powerful tool for filmmakers, enhancing storytelling, evoking emotions, and providing a sense of scale and spatial context.
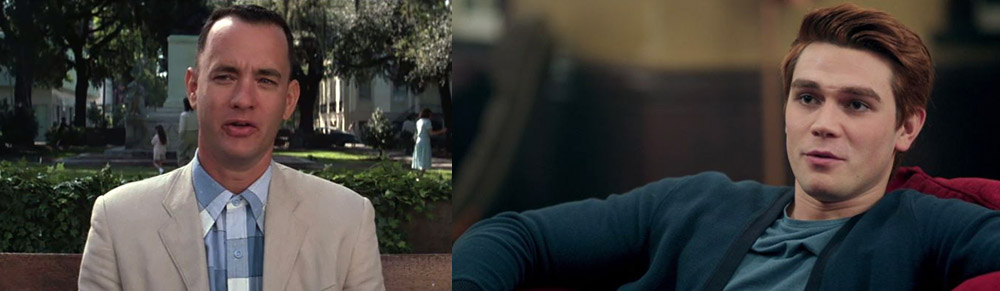
Medium Shot (MS): Showing the Character from the Waist Up
Definition:
The Medium Shot is one of the most commonly used shots in cinematic filming. It typically frames the subject from the waist up (or roughly the upper half of the body). This shot creates a balance between showing facial details and the surrounding environment, making it especially suitable for dialogue scenes, character interactions, and general situations.
Characteristics of Medium Shot:
-
Balanced View of Character and Environment: Unlike close-ups, it shows enough of the surroundings to provide context while keeping the character prominent.
-
Focus on Gestures and Expressions: MS captures hand movements, posture, and upper-body gestures, which are essential for communication and storytelling.
-
Versatility: It is widely used in conversations, interviews, and scenes where interactions between characters are important.
-
Flexibility for Camera Work: Medium shots allow for smooth camera movements, such as pans, tilts, or slight tracking, while keeping the character in focus.
Balance Between Subject and Background:
In a Medium Shot, the main character or subject is clearly visible, but enough of the background is included to provide the audience with contextual information about the environment.
Focus on Interaction:
MS is ideal for showing dialogue, body language, and character interactions. It allows the audience to observe emotional reactions and movements of the characters.
Human Perspective:
The Medium Shot is framed to make the viewer feel at a natural distance from the characters, enhancing a sense of closeness and realism.
Flexible Framing:
This shot can accommodate one or multiple characters, making it suitable for two-shots or group shots.
Applications of Medium Shot:
-
Dialogue Scenes: MS is perfect for conversation-focused scenes as it maintains attention on facial expressions and body language.
-
Showing Body Language: This shot captures hand movements, posture, and subtle gestures, helping the audience understand the characters’ emotions and intentions.
-
Providing Environmental Context: MS not only shows the character but also includes part of the surrounding space to indicate location.
-
Conveying Natural Feelings: Due to its balanced angle and natural distance, MS creates a comfortable and familiar feeling, often used in dramas and dialogue scenes.
Famous Examples of Medium Shot Usage:
-
The Godfather: Many dialogue scenes use Medium Shots to keep focus on both characters and their surroundings, such as the Corleone office.
-
Forrest Gump: Dialogue scenes between Forrest and other characters are often filmed in Medium Shot to convey intimacy and closeness.
-
Casablanca: Romantic and conversational scenes between main characters employ Medium Shots to enhance emotional connection and focus on interactions.
Comparison with Other Shots:
-
Close-Up (CU): MS frames the subject from the waist up, while a CU focuses only on the face or a specific detail of the subject.
-
Long Shot (LS): LS shows the full character along with the environment, whereas MS gives more emphasis to the character while including limited background.
Advantages and Disadvantages of Medium Shot (MS):
Advantages:
-
High Flexibility: Suitable for a variety of scenes, from dialogues to simple movements.
-
Balanced Focus: Allows simultaneous attention to both characters and the environment.
-
Natural Sense of Closeness: The appropriate distance helps the audience understand the character’s emotions and behaviors.
Disadvantages:
-
Reduced Detail Emphasis: Unlike a Close-Up, fine facial details may not be clearly visible.
-
Limited Environmental View: For showing large spaces or big action sequences, Medium Shot may be restrictive.
Conclusion:
The Medium Shot is a balanced and widely used shot in cinematography, ideal for scenes focusing on human interactions and storytelling. It allows filmmakers to present both character and environment in a harmonious way and is an effective tool across genres, from drama to action and comedy.
Techniques Related to Slow and Fast Motion:
Slow Motion (Slomo): Highlighting Movement or Emotions
Slow Motion is a visually striking and impactful technique in filmmaking where the speed of action is reduced, showing movements and events slower than in real life. This technique, achieved by altering the recording or playback speed, allows the audience to notice details that may be missed at normal speed.
How Slow Motion Works:
-
High Frame Rate Recording: Slow Motion is usually filmed at a frame rate higher than the standard 24 fps. For example, if a scene is shot at 120 fps and played back at 24 fps, the movements appear slower than normal.
-
Reduced Playback Speed: Slow Motion can also be achieved by slowing down footage shot at normal frame rates; however, this may reduce clarity and smoothness of the image.
Applications of Slow Motion:
-
Emphasizing Details: Slow motion allows the audience to see details that may be missed at normal speed, such as raindrops, a bullet in flight, or the flutter of a flag in the wind.
-
Creating Tension and Drama: This technique highlights emotional or dramatic moments, like a character’s fall or a climactic point in the story.
-
Enhancing Visual Beauty: In scenes like dance, sports, or nature, slow motion makes movements and dynamics more visually striking.
-
Showcasing Action Scenes: In action or martial arts films, slow motion is used to display punches, jumps, or explosions in detail, increasing the excitement of the scene.
-
Emphasizing the Passage of Time: Slow motion can convey a sense of suspended or extended time, particularly in moments when a character is experiencing crucial or emotional events.
Famous Examples of Slow Motion:
-
"The Matrix": The iconic "Bullet Time" effect combines slow motion with dynamic camera movement to depict gunfights and combat scenes.
-
"300": Battle scenes are captured in slow motion to create an epic and visually striking experience.
-
"Chariots of Fire": Running sequences slowed down with the film’s famous music create some of cinema’s most memorable moments.
-
Christopher Nolan films (e.g., "Inception"): Slow motion is used to depict dream sequences and variable time perception.
Advantages and Disadvantages of Slow Motion:
Advantages:
-
Visual Appeal: Special moments are shown with greater detail and artistic effect.
-
Emphasis on Emotion: Enhances emotional or climactic moments in the story.
-
Increased Excitement: Heightens thrill and grandeur in action or sports scenes.
Disadvantages:
-
Overuse Risk: Excessive use can tire the audience or reduce impact.
-
Reduced Realism: In some scenes, slow motion may diminish a sense of natural movement.
-
Equipment Requirements: High frame rate recording requires advanced camera equipment.
Conclusion:
Slow motion is a powerful cinematic technique that, by slowing down movement, can present key story moments with grandeur and greater emotional impact. It is useful not only for highlighting fine details and visual beauty but also for creating drama and excitement in pivotal scenes. Balanced use alongside other techniques is essential to maintain overall variety and engagement in a film.
Fast Motion (Fast-Mo) Technique: Creating Humor or Emphasizing Speed
Fast Motion is a cinematic technique in which the playback speed of images is increased, making movements and events appear faster than they occur in reality. This technique is commonly used to create comedic effects, emphasize the rapid passage of time, or highlight specific scenes.
How Fast Motion Works:
-
Recording at a Lower Frame Rate: Scenes are filmed at a frame rate lower than the cinema standard (24 fps). For example, if a scene is recorded at 12 fps and then played back at 24 fps, the movements appear faster than normal.
-
Playback at Higher Speed: In some cases, footage shot at a standard frame rate is sped up during post-production to achieve the fast-motion effect.
Applications of Fast Motion:
-
Showing the Passage of Time: Fast motion is used to depict processes that are naturally slow, such as sunrise and sunset, plant growth, or the passage of days and nights.
-
Creating Comedy: This technique is popular in humorous scenes, especially in silent and classic films, to exaggerate actions and create funny situations.
-
Conveying a Sense of Hurry: In scenes where characters are rushing to complete a task, fast motion helps communicate urgency.
-
Displaying Crowds or Busy Activity: To show rapid movement of people in a crowded place, such as train stations or bustling streets.
-
Emphasizing Change: Fast motion can be used to highlight rapid physical processes or unusual transformations in a scene, such as the collapse or destruction of a structure.
Famous Examples of Fast Motion:
-
Charlie Chaplin Films: In silent comedy films like Modern Times, fast motion was widely used to exaggerate humorous situations.
-
"Requiem for a Dream": Fast motion depicts the rapid, repetitive cycle of the characters’ addictions.
-
Nature Documentaries: Processes like flowers blooming or clouds moving are often shown in fast motion to compress time.
-
Jackie Chan Films: Some action and fight scenes employ fast motion to enhance excitement and highlight speed.
Difference Between Fast Motion and Slow Motion
In slow motion, movements appear slower than real life, allowing viewers to notice subtle details and emotional nuances. In contrast, fast motion speeds up actions, emphasizing energy, comedy, or a sense of urgency. While slow motion deepens drama, fast motion adds rhythm and visual excitement to a scene.
Advantages and Disadvantages of Fast Motion
Advantages:
-
Emphasizing change and the passage of time: This technique can condense long processes into visually engaging sequences.
-
Enhancing visual appeal: Increased speed adds energy, humor, or intensity to a scene.
-
Saving screen time: Long events or sequences can be shown more efficiently without losing narrative clarity.
Disadvantages:
-
Reduced realism: Fast motion can make a scene feel unnatural or overly stylized.
-
Risk of misuse: When used inappropriately, it can distract from the story or break audience immersion.
Conclusion:
Fast motion is a creative filmmaking tool that uses increased speed to convey humor, excitement, or the swift passage of time. Whether used in comedies, action sequences, or documentaries, it enhances storytelling through visual rhythm and pacing. However, like any stylistic device, it works best when applied purposefully and in balance with the film’s tone.
Composition Techniques
Rule of Thirds: Dividing the Frame to Create Visual Balance
The Rule of Thirds is one of the fundamental principles of visual composition in both filmmaking and photography. It helps create balanced and aesthetically pleasing images by dividing the frame into equal sections and guiding where key elements should be placed.
According to this rule, the frame is divided into nine equal parts by two horizontal and two vertical lines. The most visually engaging points are where these lines intersect—known as power points. Placing important elements such as a character’s eyes, the horizon, or an object of focus along these lines or intersections naturally draws the viewer’s attention and creates a sense of harmony and movement within the image.
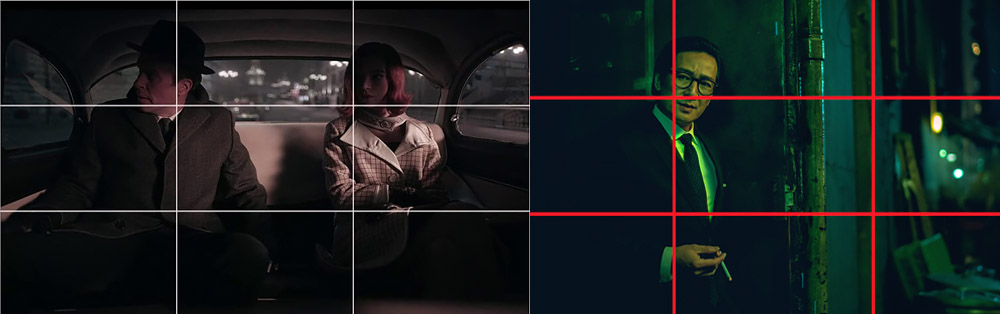
Rule of Thirds: Dividing the Frame for Visual Balance
Definition:
The Rule of Thirds divides the frame into nine equal parts using two horizontal and two vertical lines. These lines intersect at four points known as power points or golden points. The rule suggests placing key subjects or focal elements along these lines or at their intersections to create a more visually engaging and balanced composition.
Applications of the Rule of Thirds
Subject Placement:
The main subject—such as a character’s face or an important object—is ideally positioned on one of the power points or along one of the horizontal or vertical lines.
Creating Balance:
This technique helps the frame appear more balanced and directs the viewer’s attention naturally toward the most important parts of the scene.
Emphasizing Movement or Space:
In scenes involving motion or travel, the subject is often placed on one-third of the frame, leaving the remaining two-thirds to show the surrounding space or the direction of movement.
Enhancing Depth:
Thoughtful placement of elements using the rule can add a sense of depth and establish a stronger connection between the subject and the environment.
Common Uses and Examples
Portraits:
In character shots, the eyes or face are usually positioned along the top horizontal line or near a power point, guiding the viewer’s focus directly to the subject.
Landscapes:
In wide shots, the horizon line is often aligned with one of the horizontal thirds—lower for emphasizing the sky or upper for emphasizing the ground or foreground.
Dialogue Scenes:
During conversations, characters are framed in one-third of the shot, leaving the remaining space open toward the direction of the other speaker.
Action or Chase Scenes:
When capturing motion, placing the moving subject on one-third of the frame ensures enough space in the direction of movement, maintaining a dynamic flow.
Advantages and Importance
-
Visual Appeal: The Rule of Thirds creates images that feel naturally pleasing to the human eye, as our gaze instinctively follows these points of balance.
-
Guiding the Viewer’s Eye: It directs attention toward key elements of the frame and maintains narrative focus.
-
Simplifying Composition: This rule provides filmmakers and photographers with a simple yet powerful guideline to avoid cluttered or monotonous framing.
Famous Examples of Its Use
-
The Grand Budapest Hotel (2014): Although known for its symmetrical framing, many scenes use the Rule of Thirds to place characters and props in visually harmonious positions.
-
Films by Stanley Kubrick: In works like The Shining, Kubrick uses the Rule of Thirds to heighten tension and guide the viewer’s eye toward key visual details.
-
The Dark Knight (2008): Numerous dialogue and close-up scenes in the film follow the Rule of Thirds, maintaining visual balance while emphasizing the characters’ emotional expressions.
Difference from Central Composition:
In a central composition, the subject is placed at the center of the frame, creating a strong sense of balance and focus. In contrast, the rule of thirds offers more flexibility, giving the shot a more dynamic and natural feel.
Ultimately, the rule of thirds is more of a guiding principle than a strict rule. In certain situations such as symmetrical compositions or artistic imagery it can be intentionally broken. Still, understanding this rule helps filmmakers and photographers create visually appealing and professional shots while guiding the viewer’s attention purposefully.
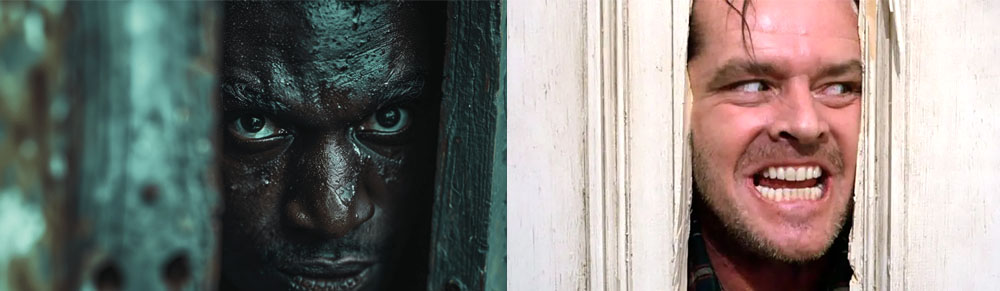
Natural Framing Technique – Using Scene Elements to Frame the Subject:
Natural Framing is a visual technique in cinematography that uses existing elements within a scene such as trees, windows, doors, or even shadows to create a natural frame around the subject. This approach enhances visual depth, draws attention to the subject, and adds an artistic touch to the overall composition.
Concept of Natural Framing:
Natural framing creatively uses natural or man-made objects and lines within a scene to draw attention to the subject. These elements act as a “frame within the frame,” separating the subject from its surroundings or guiding the viewer’s focus toward it.
Applications of Natural Framing:
-
Emphasizing the subject: Helps viewers focus on the main subject without distractions.
-
Creating depth and layering: By using foreground and background elements, it gives the image a stronger sense of three-dimensionality and space.
-
Adding narrative feeling: Natural framing can evoke a sense of looking or discovery—especially when the subject is seen through a window or doorway.
-
Enhancing visual appeal: By using natural patterns, lines, or symmetry, this technique adds artistic beauty to the composition.
Common Elements Used in Natural Framing:
-
Natural: Tree branches, caves, stone arches, shadows.
-
Architectural: Doors, windows, bridges, arches.
-
Man-made: Camera frames, mirrors, fences.
-
Light and shadow: Using natural light or shadows to create a frame around the subject.
Famous Examples:
-
Citizen Kane – Orson Welles often used windows and doorways to frame characters.
-
Lawrence of Arabia – Natural framing through desert dunes and landscapes.
-
In the Mood for Love – Framing through walls and architectural spaces to express intimacy and separation.
-
Wes Anderson films – Use of symmetrical and natural framing to guide the viewer’s eye with precision.
Advantages and Disadvantages:
Advantages:
-
Guides the viewer’s attention: Effectively directs focus toward the subject.
-
Adds artistic beauty: Enhances the scene’s aesthetic appeal.
-
Creates depth and perspective: Introduces layers and dimensionality to the image.
Disadvantages:
-
Scene-dependent: Relies heavily on the availability of suitable elements in the environment.
-
Risk of clutter: If not composed carefully, the frame can appear busy or distracting.
Key Points for Effective Natural Framing:
-
Balance between subject and frame: The frame should highlight and support the subject—not overpower or obscure it.
-
Harmony of color and light: The tones and lighting within the frame should complement the subject to create a cohesive and appealing image.
-
Combining with the rule of thirds: Using natural framing alongside the rule of thirds can result in more balanced and engaging compositions.
In conclusion, natural framing is a powerful and creative cinematography technique that adds both visual and narrative depth to a scene. It is especially effective in moments where the filmmaker wants to emphasize a subject or evoke a particular emotion. When used skillfully, it can greatly enhance the emotional and artistic impact of a film.
Handheld Shooting Technique – Creating a Realistic or Documentary Feel
Definition:
Handheld shooting is a technique where the camera is operated directly by the cinematographer without the aid of stabilizing tools such as tripods or steadicams. This approach gives the footage a raw, natural, and often immersive quality, conveying realism, urgency, or emotional tension. It is widely used in documentary filmmaking, action sequences, and dramatic scenes to create a sense of immediacy and authenticity.
Key Characteristics of Handheld Shooting:
-
Visible camera movement: Slight shakes and shifts create a sense of spontaneity and realism.
-
Dynamic framing: The fluidity of handheld movement allows for quick reframing and flexible shot composition.
-
Emotional intensity: The unsteady motion can heighten tension, intimacy, or chaos within a scene.
-
Versatility: Ideal for low-budget or guerrilla-style filmmaking, as it requires minimal equipment and setup.
Camera Movement: In handheld shooting, camera movements are often irregular and slightly shaky, which can convey a sense of excitement or make the audience feel as if they’re truly present in the scene.
Flexibility: This technique allows the cinematographer to move quickly, adjust angles on the fly, and easily access tight or difficult locations.
Documentary Feel: The natural shakes and movements of a handheld camera make scenes feel more like documentary footage, adding a layer of realism.
Applications of Handheld Shooting:
-
Creating tension and anxiety: In action or high-intensity scenes, the camera’s unsteady motion can communicate chaos and stress to the audience. Example: The Bourne Ultimatum effectively uses handheld cinematography during its chase sequences.
-
Enhancing realism: In documentaries or realistic dramas, handheld shooting strengthens the feeling of authenticity and being “in the moment.” Example: The Blair Witch Project.
-
Increasing intimacy: In emotional or personal moments, the technique brings the viewer closer to the characters and their emotions. Example: Marriage Story.
-
Encouraging creativity: Without the constraints of stabilizing gear, filmmakers can freely explore new angles, movements, and pacing.
Advantages:
-
Speed and flexibility: The camera operator can move quickly and capture spontaneous or unpredictable moments.
-
Heightened realism: Natural movement gives viewers the impression of physically being inside the scene.
-
Low cost: Handheld setups require minimal equipment, making them ideal for independent or low-budget productions.
Disadvantages:
-
Excessive shakiness: Too much motion can make the audience uncomfortable or distracted from the story.
-
Challenging control: Skilled handling is required so that the camera’s movement enhances the story rather than disrupts it.
-
Limited stability: Some scenes demand smooth, stable motion that handheld shooting cannot easily achieve.
Support Equipment:
Lightweight rigs and gimbals can be used to reduce intense shakes while preserving the freedom of handheld movement.
Notable Examples:
-
Saving Private Ryan — the handheld style in the D-Day sequence powerfully conveys the chaos of war.
-
Birdman — while known for its long takes, the film occasionally employs handheld shots to heighten energy and immediacy.
-
Cloverfield — shot entirely with handheld cameras to mimic a found-footage documentary style.
-
The Hurt Locker — uses handheld cinematography to immerse viewers in the psychological and physical tension of soldiers in combat.
Key Tips for Effective Handheld Shooting:
-
Controlled Movement: The operator should manage camera motion carefully so the natural shakes enhance the mood rather than distract from it.
-
Story Compatibility: Handheld style should fit the film’s tone and genre; for example, it may feel out of place in epic sci-fi or highly stylized dramas.
-
Practice and Skill: Experienced cinematographers can use this technique to craft scenes that feel raw, emotional, and deeply immersive.
Conclusion:
Handheld shooting remains one of cinema’s most powerful and flexible tools. When used creatively and skillfully, it can heighten realism, tension, and emotional intimacy, offering audiences a unique, immersive experience.
Time-Lapse Technique: Capturing Long-Term Change in a Short Time
Definition:
Time-lapse is a cinematography technique where images are captured at set intervals and later played back at normal or faster speeds. This creates the illusion that time is moving rapidly — making slow processes like cloud movement, plant growth, or urban development visible in just a few seconds or minutes.
How It Works:
-
Interval Shooting: The camera records frames at specific intervals — for example, one frame every five seconds or one photo per minute.
-
High-Speed Playback: These frames are then played back at standard speed (24–30 fps), compressing hours, days, or even months of real time into a short, smooth sequence.
-
Illusion of Accelerated Time: The final result makes slow, gradual changes appear dynamic and fast-moving, such as the sun’s path across the sky or a flower blooming.
Applications of Time-Lapse:
-
Depicting Natural Changes: Perfect for showing cloud formations, sunsets, plant growth, tides, and other natural phenomena.
-
Urban Transformations: Commonly used in documentaries or city films to display construction progress, traffic patterns, or city lights turning on at night.
-
Scientific Documentation: Ideal for recording slow biological or chemical processes that would otherwise go unnoticed in real time.
-
Enhancing Visual Aesthetics: The accelerated movement creates striking visuals, especially in landscape and nature cinematography, offering a poetic sense of time passing.
In essence, time-lapse bridges the invisible rhythm of time and the visible world — turning slow, imperceptible transformations into captivating cinematic moments.
Advantages:
Showcasing long-term changes: This technique is especially useful for capturing gradual or long-term transformations that would otherwise appear too slow in real time.
Creating visual appeal: By speeding up events, filmmakers can produce visually stunning and unique imagery that’s rarely seen in traditional cinema or documentaries.
Enhancing storytelling: Time-lapse can help convey the passage of time or the evolution of events within a story, adding rhythm and emotional depth to the narrative.
Disadvantages:
Requires time and precise planning: Capturing the images for a time-lapse demands careful scheduling and consistent shooting. Some sequences may require continuous recording for hours or even days.
Not suitable for fast movements: Time-lapse isn’t ideal for capturing rapid actions or sudden changes, as the final result might look unnatural or disjointed.
Demands precise camera settings: The camera must be configured to take frames at exact intervals to ensure high-quality and consistent results.
Notable examples of time-lapse use:
-
“In the Mood for Love” – This film uses time-lapse to evoke the passage of time and environmental changes, enhancing its emotional atmosphere.
-
“Life in a Day” – A documentary composed of footage from people around the world, it uses time-lapse sequences to depict the flow of everyday human life.
-
“Koyaanisqatsi” – In this experimental documentary, time-lapse visuals of human activity and nature create striking contrasts and powerful imagery.
-
“The Secret Life of Plants” – This scientific documentary uses time-lapse to reveal the hidden movements and growth processes of plants.
Key points for effective time-lapse shooting:
-
Precise interval timing: The intervals between shots are crucial. They should be chosen based on the natural pace of the subject or event.
-
Consistent lighting: Maintaining steady lighting prevents unwanted flickering or shadow shifts, ensuring a smooth final sequence.
-
Use of stabilization and control tools: For more accurate results, filmmakers often employ rigs, motion controllers, or gimbals to keep the camera steady throughout the shoot.
In conclusion, time-lapse is a powerful cinematographic technique that allows filmmakers to compress time and showcase gradual or subtle transformations in a visually captivating way. It’s particularly valuable for documenting natural phenomena, urban development, or visual storytelling in both artistic and documentary films.
Motion Blur Technique: Creating a Sense of Speed Through Blurred Movement
Motion blur is a widely used technique in cinematography and visual effects, applied either naturally during shooting or artificially in post-production. It occurs when fast-moving objects or the camera itself cause streaking or blurring in the image. This effect arises because the sensor or film captures light while the subject is in motion, resulting in elongated or smeared visuals. Motion blur can add a sense of speed, energy, or even a distinctive stylistic feel to a scene.
How motion blur is created:
Motion Blur Technique: Enhancing Speed and Realism Through Blur
How Motion Blur is Achieved:
-
Slow Shutter Speed: During filming, lowering the camera’s shutter speed keeps each frame exposed to light for a longer duration, causing moving subjects to appear streaked or blurred.
-
Fast Movement of Camera or Subject: When either the camera or the subject moves quickly while the shutter speed is set appropriately, natural motion blur occurs.
-
Artificial Post-Production: In visual effects (VFX) or digital editing, motion blur can be added artificially to enhance the sense of realistic motion.
Applications of Motion Blur:
-
Enhancing Sense of Speed: In action scenes such as car chases or sports sequences, motion blur conveys motion and dynamism. Example: Fast & Furious racing scenes.
-
Creating Realism: For films with rapid camera movement, motion blur gives a natural look, mimicking how the human eye perceives fast motion in real life.
-
Artistic and Stylistic Effects: In visually stylized or artistic sequences, motion blur can add beauty and a cinematic flair.
-
Indicating Time or Movement: This technique can illustrate fast actions or the passage of time in a scene. Example: The Matrix combined with "Bullet Time."
Advantages:
-
Emphasizes Movement: Motion blur highlights motion and adds energy to a scene.
-
Enhances Realism: Provides a more natural sense of speed and acceleration.
-
Boosts Visual Appeal: In some sequences, motion blur contributes to the aesthetic impact of the shot.
Disadvantages:
-
Loss of Detail: Motion blur can obscure fine details of objects or the environment, which may be undesirable in certain scenes.
-
Potential Confusion: Excessive use can disorient or tire the viewer.
-
Complicates Editing and VFX: Heavy motion blur may make compositing or adding digital effects more challenging.
Camera Settings for Motion Blur:
-
Shutter Speed: Using a slower shutter speed (e.g., 1/30 or 1/60 second) increases motion blur.
-
Camera Movement: Techniques such as panning or dolly shots can create natural motion blur.
-
Aperture and ISO: To prevent overexposure when lowering shutter speed, use a smaller aperture (f/8 or higher) and lower ISO settings.
Notable Examples of Motion Blur:
-
The Matrix: Motion blur is combined with other visual techniques like "Bullet Time" in action and fight sequences.
-
Mad Max: Fury Road: During high-speed chases, motion blur amplifies the sense of speed and intensity.
-
Saving Private Ryan: In battle scenes, motion blur enhances chaos and realism.
-
Video Games: Titles like Call of Duty and Forza Horizon use motion blur to increase realism and visual appeal.
Key Tips for Effective Use of Motion Blur:
-
Match the Film’s Style: Motion blur should align with the overall tone and style of the film to maintain visual coherence.
-
Control the Amount: The blur should be carefully adjusted to enhance the scene without overwhelming or confusing the audience.
-
Use Creatively: Combining motion blur with techniques like slow motion or time-lapse can produce striking visual effects.
Conclusion:
Motion blur is a powerful tool for filmmakers and VFX artists, adding a heightened sense of movement, speed, and energy to scenes. When applied thoughtfully, it gives viewers a richer, more dynamic, and immersive cinematic experience.
The Role and Significance of Cinematography Techniques
-
Visual Storytelling: Cinematography techniques allow filmmakers to tell the story through images. Camera angles can present characters or scenes from a specific perspective (e.g., a low-angle shot to convey power). Camera movements, such as dolly or pan, guide the viewer’s attention to key parts of a scene and enhance narrative flow.
-
Conveying Emotions and Mood: Different techniques are powerful tools to evoke emotions in the audience. For example:
-
High-contrast lighting: Creates tension or a sense of mystery.
-
Slow motion: Amplifies emotional intensity in action or dramatic scenes.
-
Close-ups: Highlight facial expressions and subtle emotional cues.
-
-
Creating Visual Aesthetics: Filmmakers use specific techniques to craft visually compelling images, enhancing the audience’s aesthetic experience. For example:
-
Natural Framing: Uses existing scene elements to create visually pleasing, balanced compositions.
-
Rule of Thirds: Establishes harmony and visual appeal within the frame.
-
-
Directing Viewer Focus: Cinematography helps guide the audience’s eye to important or meaningful elements of a scene. For example:
-
Shallow focus: Isolates the subject from the background, drawing attention.
-
Rack focus: Shifts focus between subjects within a scene to guide attention dynamically.
-
-
Adding Visual Variety: Techniques like changing camera angles, movements, or focus prevent visual monotony and keep the audience engaged.
-
Defining Characters and Setting: Certain techniques give depth to characters and environments. For example:
-
Long shot: Places the character within the broader environment.
-
Medium shot: Shows interactions between characters.
-
-
Creating Rhythm and Energy in the Narrative: Camera movements and visual editing techniques set the scene’s rhythm. For example:
-
Time-lapse: Shows the passage of time quickly, energizing the narrative.
-
Fast motion: Highlights rapid passage of time or adds a comedic effect.
-
-
Enhancing Thematic and Conceptual Meaning: Cinematography can subtly support the film’s themes. For example:
-
Natural lighting: Conveys realism and simplicity.
-
Eye-level shots: Provide a neutral perspective on the scene.
-
-
Establishing a Film’s Visual Identity: Unique techniques give each film a distinct visual signature. For example:
-
Wes Anderson films: Recognized for symmetrical framing and distinct color palettes.
-
Blade Runner 2049: Known for neon lighting and complex compositions.
-
-
Connecting with the Audience: Professional cinematography engages viewers and strengthens their emotional connection to the story. For example:
-
Steadicam or handheld movements: Create a sense of presence within the scene.
-
Smooth dolly movements: Gently guide viewers through the environment.
In essence, cinematography techniques are not just about capturing images—they shape how the audience experiences the story, feel emotions, perceive characters and settings, and ultimately immerse themselves in the film’s world.
Differences and Similarities Between Standard Filming Techniques and Cinematic Filming Techniques
Filming techniques and cinematic filming techniques are conceptually related but differ in purpose, complexity, and application. Here’s a detailed breakdown:
1. Standard Filming Techniques (Filming Techniques):
These refer to the basic principles of capturing video, applicable to any type of production, including documentaries, advertisements, educational videos, or digital content. They are generally practical and functional. Typical examples include:
-
Lighting: Use of natural or artificial light.
-
Framing and Camera Angles: Standard setups for composing shots.
-
Simple Camera Movements: Such as pan, tilt, or basic tracking.
-
Focus and Exposure Adjustments: Ensuring clarity and proper lighting in shots.
These techniques prioritize clarity, functionality, and efficiency rather than creating a strong emotional or artistic impact.
2. Cinematic Filming Techniques:
These are techniques specifically used to create a cinematic feel. They are more advanced and intentional, often designed to evoke emotions, convey complex ideas, or enhance the visual aesthetics of a scene. Key characteristics of cinematic techniques include:
-
The use of artistic composition within the frame.
-
Employing special lighting styles, such as Rembrandt lighting, low-key, or other cinematic setups.
-
Advanced camera movements like dolly zooms or crane shots.
-
Precise synchronization between sound, editing, and visuals to strengthen the storytelling.
-
A strong focus on color choices and visual palettes that match the film’s tone and mood.
Key Differences Between Standard and Cinematic Filming Techniques
The main distinctions between regular filming and cinematic filming lie in their purpose, equipment, and approach. Below are some of the most important differences:
2. Cinematic Filming Techniques (Cinematic Filming Techniques):
These techniques are designed specifically to create a cinematic feel. They are more advanced and intentional, aiming to evoke emotions, convey complex messages, or enhance visual aesthetics. Key features include:
-
Artistic Composition: Deliberate framing and arrangement of elements within the shot.
-
Specialized Lighting: Techniques like Rembrandt lighting, low-key lighting, or other cinematic setups to create mood and depth.
-
Advanced Camera Movements: Dolly zooms, crane shots, Steadicam sequences, and fluid tracking shots.
-
Integration of Sound, Editing, and Visuals: Careful coordination to strengthen storytelling.
-
Color Grading and Palette Choices: Selection of colors that support the film’s tone and emotional impact.
These techniques aim not just to capture images, but to craft an experience that resonates with the audience emotionally and visually.
Key Differences Between Standard Filming Techniques and Cinematic Filming Techniques
The main differences between standard filming techniques and cinematic filming techniques lie in purpose, complexity, equipment, and how they are applied. Here’s a detailed comparison:
1. Purpose and Application
-
Standard Filming Techniques: Primarily practical and functional, used in non-cinematic video productions such as advertisements, documentaries, educational videos, or short clips. The focus is on capturing the content clearly and efficiently.
-
Cinematic Filming Techniques: Specifically designed for cinematic productions and artistic works, aiming to convey deeper messages and tell stories visually. The goal is to evoke emotion and create a strong visual narrative.
2. Complexity and Equipment
-
Standard Filming Techniques: Usually applied in smaller-scale or non-professional projects, often using simpler equipment like consumer cameras or basic digital cameras.
-
Cinematic Filming Techniques: Require more complex techniques and advanced equipment, including professional cinema cameras, specialized lenses, sophisticated lighting setups, and precise camera movements.
3. Focus on Aesthetics
-
Standard Filming Techniques: Emphasize technical aspects such as image clarity, exposure, and color balance.
-
Cinematic Filming Techniques: In addition to technical quality, they place strong emphasis on visual aesthetics. Every choice—framing, lighting, camera movement—is made to elicit specific emotions from the audience.
4. Use of Lighting
-
Standard Filming Techniques: Lighting is usually simple, serving mainly to illuminate the scene or ensure image clarity.
-
Cinematic Filming Techniques: Lighting is complex and deliberate, used to create mood, highlight characters, and emphasize narrative elements or dramatic moments.
5. Storytelling and Emotional Impact
-
Standard Filming Techniques: Storytelling is often minimal; the focus is on delivering information or presenting the subject clearly.
-
Cinematic Filming Techniques: Every camera technique is designed to enhance storytelling and create an emotional connection with the audience. This includes specific shot choices, camera movements, and lighting strategies to evoke feelings and immerse viewers in the narrative.
6. Camera Movement
-
Standard Filming Techniques: Camera movement is often limited to simple or static adjustments, such as basic pans or tilts.
-
Cinematic Filming Techniques: In cinema, camera movement can be far more complex and is used to create specific visual or emotional effects, such as dynamic tracking shots, long takes, or sweeping crane movements that enhance the storytelling.
7. Post-Production
-
Standard Filming Techniques: Non-cinematic videos usually require minimal post-production work.
-
Cinematic Filming Techniques: Films often demand advanced post-production, including precise color grading, visual effects, and detailed editing to achieve a polished cinematic experience.
In Summary:
Cinematic filming techniques are more complex and artistic due to their focus on deeper storytelling and visual aesthetics. While there are clear differences between standard and cinematic techniques, they also share many similarities:
Key Similarities Between Standard and Cinematic Filming
-
Shared Technical Principles: Both types rely on fundamental camera settings—exposure, aperture, shutter speed, and ISO—to control image quality and clarity. Understanding these settings is crucial in both contexts.
-
Composition Fundamentals: Both use principles of composition such as camera angles, framing, leading lines, and the Rule of Thirds to create visually balanced and engaging shots.
-
Camera Movements: Both employ movements like pan, tilt, zoom, and slow motion to emphasize details, guide the viewer’s attention, or convey story elements. The techniques may differ in complexity but serve similar purposes.
-
Lighting Control: Lighting is essential in both styles. Proper use of natural and artificial light, backlighting, or three-point lighting ensures clarity and helps convey the desired mood or emotion.
-
Lens Choice: Selecting the right lens to control field of view and depth of field is important in both types of filming. Wide-angle, telephoto, or macro lenses are used to create specific perspectives and influence the visual storytelling in both standard and cinematic productions.
6. Visual Storytelling: In both standard and cinematic filming, visual storytelling is crucial. Whether in feature films or video projects, the goal is to convey information and emotions to the audience through images without relying solely on dialogue. Specific shots, camera movements, and composition techniques all work together to communicate the story effectively.
7. Post-Production and Editing: Post-production exists in both types of filming. While cinematic projects often require more sophisticated editing, standard video projects also use post-production tools for color correction, visual effects, and sound-image integration.
8. Ambient Sound and Audio Recording: Capturing sound is essential in both styles to create a realistic and immersive experience. This includes recording ambient sounds, dialogue, sound effects, and music, all of which complement the visuals and help establish an emotional connection with the viewer.
9. Camera Angle Selection: In both types of filming, the choice of camera angle helps convey emotions or emphasize specific elements of the story. This can include wide shots to show locations, close-ups to reveal emotions, and extreme close-ups to highlight crucial details.
10. Purpose: Conveying Emotions and Messages: The primary aim in both styles is to transmit meaning and emotion to the audience. This is achieved through shot selection, camera movement, lighting, and composition.
In Conclusion: While cinematic filming techniques are generally more complex and artistic, standard filming still relies on similar foundational principles. Both types share core practices in lighting, composition, camera movement, and visual storytelling. Cinematic techniques are essentially a specialized, advanced subset of general filming, designed to provide a richer and more emotionally engaging experience for the audience. Simply put, filming techniques can be applied to any type of video, but cinematic techniques are specifically tailored for feature films and high-end productions.
Origins and Development of Filming Techniques
Cinematic filming techniques emerged through a collective and evolutionary process in the history of cinema and cannot be attributed to a single individual. Over time, these techniques were shaped by filmmakers, directors, and technological advancements. Different individuals and movements throughout cinematic history played key roles in developing and refining these methods.
Influential Figures in the Development of Filming Techniques:

1. Edwin S. Porter: One of the earliest filmmakers to introduce concepts like continuity editing and cutting in The Great Train Robbery (1903). He expanded basic filming techniques such as camera movement and simple framing.
2. D.W. Griffith: A pioneer of cinematic language, Griffith introduced techniques such as close-ups and parallel editing in films like The Birth of a Nation. His narrative style laid the foundation for many modern filmmaking techniques.
3. Sergei Eisenstein: Creator of Soviet montage techniques, including the “montage of contrasts,” which played a crucial role in storytelling and evoking emotions. Notable example: Battleship Potemkin (1925).
4. Gregg Toland: Innovator of deep focus cinematography in Citizen Kane (1941), which used depth of field to create complex visual compositions. His advancements in lighting and specialized lens usage had a major influence on cinema.
5. Lumière Brothers: Pioneers of early cinema who developed cameras to capture real-life moments. While their techniques were simple, they laid the groundwork for future cinematic innovations.
6. Robert Drew and Garrett Brown:
-
Robert Drew: A pioneer in realistic, documentary-style filmmaking.
-
Garrett Brown: Inventor of the Steadicam, revolutionizing smooth and fluid camera movement.
Influential Movements and Groups
1. German Expressionism: Focused on dramatic lighting, sharp angles, and unconventional framing to create intense, atmospheric moods. Example: The Cabinet of Dr. Caligari (1920).
2. Italian Neorealism: Emphasized handheld cameras and natural lighting to achieve documentary-like realism. Filmmakers like Vittorio De Sica and their cinematographers popularized this style.
3. French New Wave: Cinematographers such as Raoul Coutard, working with directors like Jean-Luc Godard, introduced free, experimental, and innovative filming approaches.
Technology and Its Impact
Technological advancements played a vital role in developing new cinematic techniques:
-
Special lenses enabling deep focus shots.
-
Lightweight, portable cameras for documentary-style filming.
-
Artificial lighting and indoor cinematography innovations.
Conclusion:
Cinematic filming techniques are the product of continuous innovation throughout cinema history. Pioneers like D.W. Griffith, Sergei Eisenstein, and Gregg Toland were instrumental, but the evolution of these techniques relied on collaboration among filmmakers, directors, and inventors over time.

Sadjad Jahangiri
![Verified]()